
For any engineering leader steering a complex hardware program, success boils down to managing risk. A single post-silicon bug can trigger million-dollar respins and catastrophic schedule delays, derailing a product launch. This is the problem the Universal Verification Methodology (UVM) was created to solve. It’s the industry-standard framework for proving that modern SoCs, ASICs, and other intricate digital designs actually work before you commit to manufacturing.
This guide is for technical leaders—VPs of Engineering, program managers, and lead engineers—who need to decide if, when, and how to adopt a UVM-based verification strategy. It’s most relevant for teams developing complex, high-stakes hardware where design errors carry significant financial or safety risks. This is not an implementation tutorial for junior engineers. Instead, it provides a strategic framework for de-risking your program by moving from chaotic, ad-hoc testing to a disciplined, predictable verification process.
We will cover:
- Why ad-hoc verification introduces unacceptable risk and fails to scale.
- How UVM’s core architecture creates a reusable, data-driven framework.
- The business impact of adopting UVM: risk reduction, faster time-to-market, and objective decision-making.
The Problem: When Ad-Hoc Verification Breaks Down
As product complexity explodes, legacy verification methods become a primary source of project risk. Ad-hoc, project-specific testbenches are often brittle, heavily dependent on the tribal knowledge of individual engineers, and nearly impossible to reuse. This unstructured approach fails to scale and often misses the subtle, corner-case bugs that lead to field failures. Catching a bug after tape-out can easily cost millions in non-recurring engineering (NRE) fees and push a product launch back by months.
This is precisely why a standardized methodology like UVM is now the default for complex designs. Think of it less as a library of code and more as a strategic discipline for proving a design is correct before you commit capital to silicon.
This structured approach has a direct and measurable impact on business outcomes. By creating reusable verification components and using constrained-random stimulus, engineering teams can unearth obscure bugs that directed, manual testing would almost certainly miss. The result is a more robust product, a predictable time-to-market, and the data-driven confidence that your device will perform as intended. To dig deeper into these critical phases, it’s worth understanding the key differences between design verification and design validation.
The Shift from Testing to Verifying
The move to UVM marks a fundamental shift in mindset—from simply "testing" a design to methodically "verifying" it. Ad-hoc methods are often reactive and dependent on individual heroics, making them a major liability for program predictability.
UVM, on the other hand, enforces a consistent, modular architecture. This promotes collaboration and makes it possible to reuse proven verification components and infrastructure across different projects and even different teams. This standardization is what transforms verification from an unpredictable art into a repeatable engineering discipline.
For CTOs and program managers, adopting UVM provides a clear, objective framework for measuring progress and assessing risk. Instead of relying on gut feelings, teams can point to concrete coverage metrics to justify design closure and make the high-stakes tape-out decision with confidence.
Decision Criteria: Ad-Hoc vs. UVM Methodology
The table below contrasts the legacy ad-hoc approach with the modern UVM standard, showing how this methodological shift directly impacts critical project outcomes.
| Metric | Ad-Hoc Verification (Legacy) | UVM Verification (Modern Standard) | Business Impact |
|---|---|---|---|
| Reusability | Low; components are project-specific. | High; standardized components (VIP) are reused across projects. | Reduced engineering cost; faster TTM for derivative products. |
| Bug Detection | Relies on directed tests; misses corner cases. | Systematic; constrained-random stimulus finds unexpected bugs. | Lower risk of field escapes, recalls, and warranty costs. |
| Debug Time | High; inconsistent testbenches make root cause analysis difficult. | Reduced; modular architecture and clear logging simplify debugging. | Improved engineering efficiency; schedules are more predictable. |
| Predictability | Low; progress is anecdotal, and timelines often slip. | High; provides objective metrics for data-driven tape-out decisions. | Enables confident program planning and risk assessment. |
| Project Risk | High; significant risk of costly silicon respins. | Mitigated; drastically reduces the probability of late-stage bugs. | Protects NRE investment and market launch window. |
As you can see, the move to UVM is about more than just technology. It’s a strategic decision to de-risk projects, improve engineering efficiency, and build a more predictable path to delivering successful, high-quality products.
The Solution: UVM's Modular Testbench Architecture
If you've dealt with the chaos of ad-hoc hardware verification, you know the pain: tangled scripts, non-reusable code, and tests that are impossible to scale create massive project risk. To manage today's complex designs, you must understand the structure of a UVM testbench.
A UVM environment isn't a monolithic block of code. It’s a highly organized, modular system of components working together. The best way to think about it is like a sophisticated, automated factory assembly line built specifically for verification. Every station on this line has a very specific, reusable job.
This component-based approach is what gives UVM its power. It brings order to chaos, creating a predictable and scalable framework that replaces messy, one-off test setups. Each piece is built to be self-contained but also plug-and-play, letting engineering teams build powerful verification environments without constantly reinventing the wheel.
The difference between the old way and the UVM way is stark.
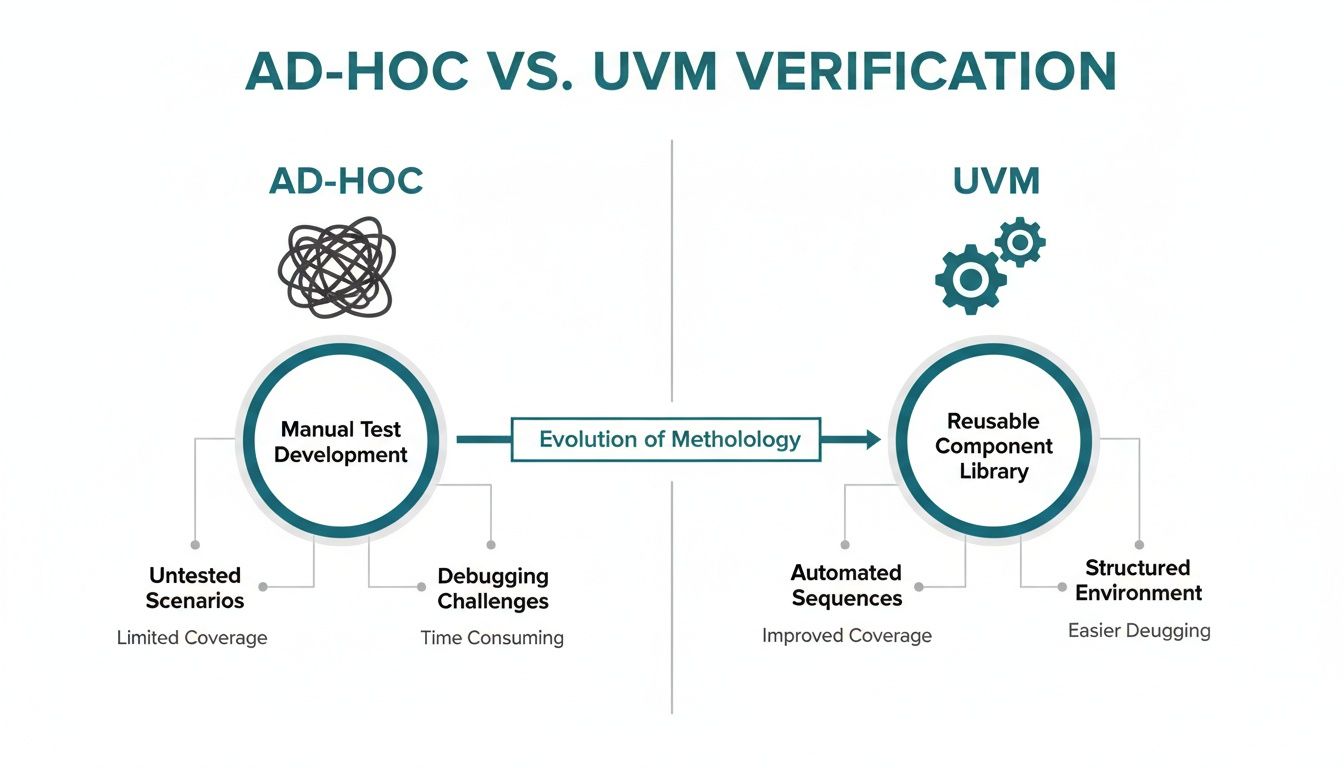
As you can see, UVM replaces the tangled mess of legacy methods with a structured system where every component has its place and purpose, working in concert like a set of well-oiled gears.
The Key Components of a UVM Environment
At its heart, a UVM testbench is made up of several standard classes, each with a distinct role. Knowing how these pieces fit together is the first step toward building a testbench that can systematically hunt down bugs.
Let's walk through the main components using our factory assembly line analogy:
- Driver: The "robotic arm." It takes abstract instructions (transactions) and translates them into the pin-level signals needed to poke and prod the Design Under Test (DUT). Its only job is to drive stimulus onto the DUT's interfaces.
- Monitor: The "quality control inspector." It passively watches the DUT's interface signals, never interfering. It captures activity and converts it back into abstract transactions, broadcasting them for other components to analyze.
- Sequencer: The "production scheduler." The Sequencer orchestrates what transactions get sent to the Driver and in what order. It manages everything from simple, direct test scenarios to complex, constrained-random sequences designed to stress the DUT in ways a human would never imagine.
- Agent: A complete "workstation." It neatly packages the Driver, Monitor, and Sequencer for a specific interface (e.g., AXI, I2C, or PCIe). This packaging makes the verification IP for an entire interface modular and incredibly reusable.
These components don't operate in a vacuum. They are organized within a larger structure to create a complete, self-checking test environment.
Tying It Together: The Scoreboard and Automated Checking
The Scoreboard is the final "chief inspector" that enables automated checking. It receives transactions from Monitors watching the DUT's inputs and outputs. It then compares the actual output against expected results based on a predictive model of the design. The Scoreboard's sole job is to decide if the DUT is behaving correctly, flagging a pass or fail.
This systematic, automated checking is what allows teams to run huge regressions with thousands of tests overnight and return the next morning to a clear report of what failed. It transforms verification from a manual, error-prone chore into an automated, data-driven discipline. This directly reduces program risk and provides objective confidence in design quality. Building a testable system from the ground up is a core principle at Sheridan Technologies, ensuring verification is baked into the design, not tacked on as an afterthought.
The Outcome: Executing a Predictable UVM Workflow
A well-structured UVM testbench is just the starting point. The real value is realized when you put that testbench to work inside a disciplined, repeatable workflow. UVM verification isn't a one-shot task; it's a continuous cycle of building, running, and analyzing that methodically closes the gap between a design specification and a fully verified chip.
This "Build-Run-Analyze" loop transforms verification from a chaotic scramble into a predictable, data-driven engineering process.
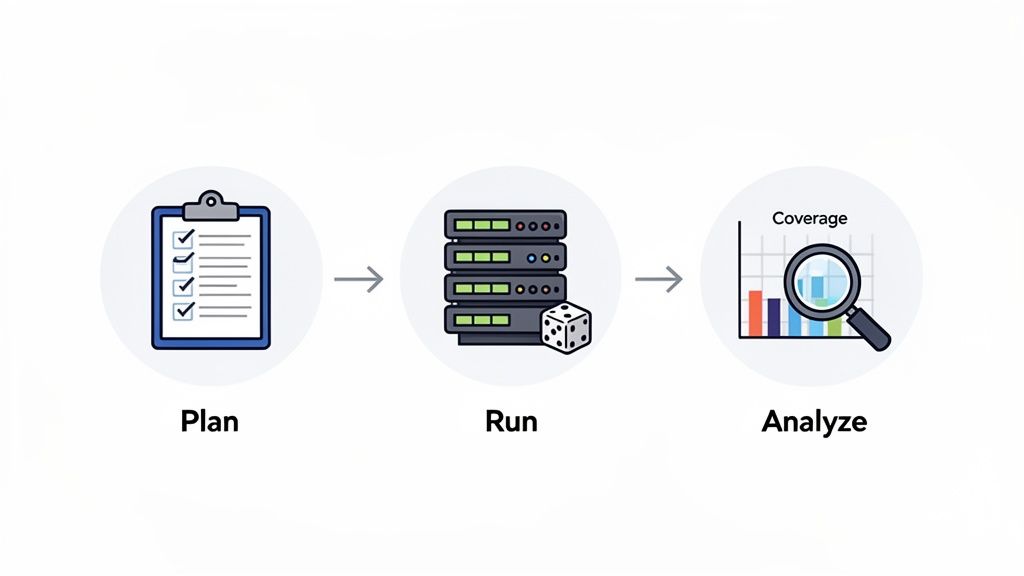
Step 1: Build a Data-Driven Verification Plan
Before any code is written, the work begins with a comprehensive verification plan. This is arguably the single most critical document in the process. Think of it as the master blueprint that defines what "done" looks like, translating product requirements into a concrete set of testable features.
This plan details every feature, protocol, and corner case that needs to be hit. Crucially, it defines the specific coverage metrics that will be used to measure progress and prove completeness:
- Code Coverage: Measures which lines of the RTL design code have been executed. It’s a useful sanity check but a poor indicator of functional correctness on its own.
- Functional Coverage: This is the real measure of quality. It tracks whether specific scenarios, corner cases, and feature combinations defined in the plan have actually been tested.
- Assertion Coverage: Monitors how often specific design properties (assertions baked into the design) have been activated and checked during simulation.
Without a detailed plan, verification efforts are rudderless. You're just running tests in the dark—and that’s how bugs slip through to silicon.
Step 2: Run Regressions and Generate Stimulus
With the plan as our guide, the team develops UVM sequences to generate stimulus. This is where UVM’s power of constrained-random testing comes into its own. Instead of writing hundreds of rigid, hand-coded tests, engineers write smart sequences that can generate thousands of unique—but always valid—scenarios.
These tests are then compiled and run in a regression—a large suite of automated tests fired off on powerful server farms, usually running overnight or continuously. This constant cycle of testing allows the team to:
- Find Bugs Early: New code check-ins are immediately hammered by the full test suite, catching regressions almost as soon as they’re introduced.
- Explore Corner Cases: Randomization has a knack for uncovering bizarre bugs a human engineer would never think to test for manually.
- Run at Massive Scale: Server farms execute thousands of test variations in parallel, dramatically compressing the verification timeline.
Operating Scenario: Safety-Critical ASIC Verification
An industrial automation firm is building a new motor control ASIC for a robotic arm. A bug could cause catastrophic equipment failure. The timeline is a non-negotiable 6 months to tape-out, and their small team of four engineers is struggling with ad-hoc methods.By adopting UVM, they build a reusable testbench and create constrained-random sequences modeling motor stalls, voltage spikes, and unexpected sensor data. Every night, their regression farm runs over 10,000 unique, randomized test scenarios.
Two months in, an overnight regression flags a critical failure. A rare combination of a specific command sequence during a simulated brownout condition caused a state machine to lock up—a nasty corner-case bug that directed testing would have almost certainly missed. Finding and fixing this pre-silicon prevents a costly product recall and a potential safety incident, showing the direct business impact of a methodical UVM workflow.
Step 3: Analyze Results and Close on Coverage
The final piece of the loop is analysis. After a regression, the team isn’t just looking at a pass/fail list. They’re diving deep into the data, pouring over coverage reports to see what was—and, more importantly, what was not—tested.
This analysis is what drives the process forward. If functional coverage for a key feature is stuck at 80%, the team knows exactly where the gaps are. They can then refine their constraints to steer the random stimulus toward those untested areas or, if needed, write a few highly-targeted tests to close the gap. For a wider view on ensuring product quality, check out our guide on the core principles of software quality assurance and testing.
This cycle repeats until all goals in the verification plan are met. Only when the data provides hard evidence that all specified features are covered can a team confidently declare "verification closure" and give the green light for tape-out.
Risks and Tradeoffs: Common UVM Pitfalls
Adopting UVM is not a silver bullet. Like any powerful framework, it comes with common traps that can derail projects and create a dangerous false sense of security. Knowing these failure modes is the first step toward building a verification process that delivers real value. Getting it wrong means you're stuck with the overhead costs without the strategic benefits—a process that’s both expensive and ineffective.
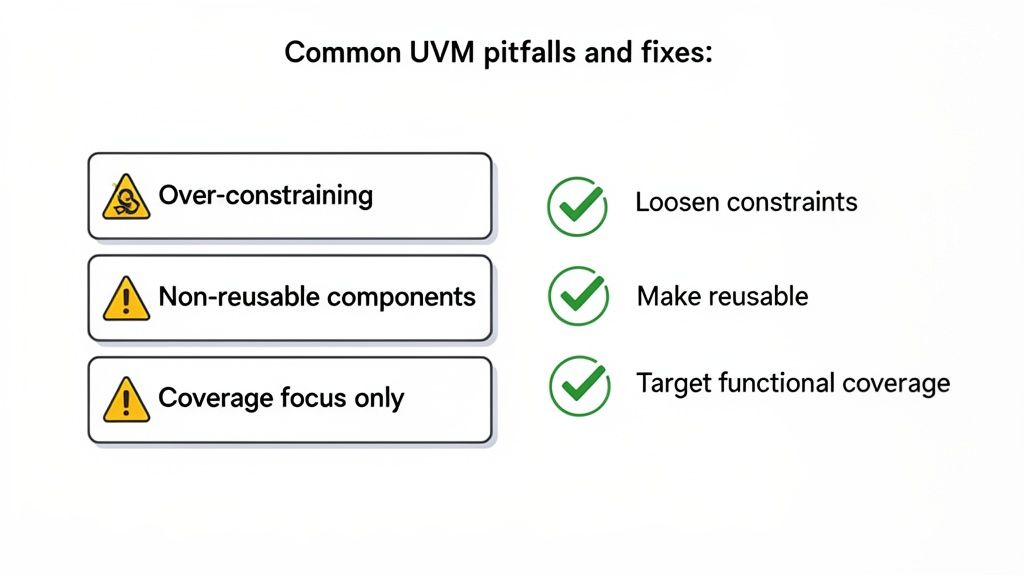
Failure Mode 1: Treating UVM Like Directed Testing
The core power of UVM is its constrained-random stimulus engine, which explores vast state spaces to find unexpected bugs. A classic mistake is writing sequences with constraints so tight they effectively become directed tests. This completely defeats the purpose of randomization. When engineers over-constrain tests, they force the simulation down a pre-determined path, severely limiting its power to uncover novel, corner-case bugs.
Correction: Define constraints as broadly as possible while still generating legal stimulus. The goal is to guide randomness, not kill it. Focus on creating a rich, unpredictable environment that stresses the design in ways you hadn't anticipated.
Failure Mode 2: Chasing Code Coverage as the Finish Line
Chasing 100% code coverage is a classic vanity metric. It proves that every line of your RTL was executed, but it says almost nothing about whether the design is functionally correct. A design can hit perfect code coverage and still be riddled with critical bugs. Letting a regression report "all green" based on code coverage alone gives a dangerously false sense of completion.
Correction: Prioritize Functional Coverage. This metric tracks whether the specific scenarios, feature interactions, and corner cases from your verification plan have actually been hit. Set specific goals for every key feature, and use coverage analysis to find the "holes" in your verification and guide you in writing new constraints to fill them.
Failure Mode 3: Building Single-Use Verification IP
One of UVM's biggest long-term wins is reusability. Yet, teams under pressure often hardcode project-specific logic directly into their UVM agents. This creates components that are impossible to use on the next project, forcing engineers to reinvent the wheel every time. This mistake turns a potential strategic asset into a one-off tactical expense.
Correction: Be disciplined about separating interface-specific logic from test-specific logic. Build UVM agents to be configurable and generic, driven by parameters instead of hardcoded values. This discipline is what makes your verification IP a true asset.
When Is UVM Overkill?
It’s also crucial to recognize when UVM is not the right tool. For a simple FPGA with a few control registers, setting up a full UVM environment is often unnecessary overhead. A simpler, direct SystemVerilog testbench might be faster to write and perfectly adequate.
However, for a multi-core SoC going into a medical device or an aerospace application, using anything less than UVM is a non-starter. The complexity and risk profile demand a rigorous, systematic, and coverage-driven approach.
Understanding these traps and applying best practices ensures your investment in UVM pays off, leading to more robust products and predictable project outcomes.
Next Steps: Putting UVM to Work
It’s one thing to understand the theory of UVM. It’s another to execute it under pressure, where a single bug can derail a high-stakes product launch. At Sheridan Technologies, we bring the UVM discipline needed to give engineering leaders real confidence to move from prototype to production, especially in regulated industries like aerospace, medical devices, and robotics where failure is not an option.
Our teams don't just verify a design after the fact; we bridge the gap between design and verification. We believe in designing for testability from day one, ensuring your product is verifiable by design, not by accident. This integrated approach prevents late-stage surprises that blow up schedules and budgets.
We have applied UVM verification in some of the most demanding environments, ensuring every corner of your design is methodically stress-tested and proven. The goal isn't just finding bugs; it's generating objective, data-driven proof that your system is ready for manufacturing and compliance. For complex products, this level of rigor is essential. Our expertise in UVM verification extends to creating robust test plans that stand up to regulatory scrutiny. You can read more in our detailed guide on medical device verification and validation processes.
If your current verification plan feels more like a source of risk than a solution, we should talk.
Monday Morning Checklist: Assess Your Verification Strategy
Before you commit to a verification approach, answer these questions:
- Define Your Risk Profile: What is the business cost of a silicon respin or a major field failure for this product? Is it thousands of dollars or millions? Does it carry safety implications?
- Evaluate Design Complexity: Does your design include multiple complex IP blocks, high-speed interfaces, or intricate state machines? Is it a simple FPGA or a multi-million-gate SoC?
- Audit Your Reusability: How much verification effort from your last project can be directly applied to your next one? If the answer is "not much," you have a reusability problem.
- Review Your "Done" Criteria: How do you decide verification is complete? Is it based on an anecdotal "it seems stable" or on hitting specific, pre-defined functional coverage goals from a verification plan?
- Check Your Team's Bandwidth: Does your team have the expertise and time to build and maintain a UVM environment, or would bringing in specialists accelerate the schedule and reduce risk?
Answering these questions honestly will clarify whether your current approach is sufficient or if it's time to invest in a more disciplined, UVM-based strategy.
At Sheridan Technologies, our expertise lies in implementing this rigorous UVM discipline to de-risk complex product development. We help you move from prototype to production with confidence.
Schedule an architecture consult to strengthen your verification strategy.